Microsoft Intune Management Extension – Win32 Apps

What is the Intune Management Extension

The Intune Management Extension is a complement to the out of the box windows management functions like the Mdmclient. The IME allows to install applications on managed systems or to execute e.g., PowerShell scripts. Additionally, the IME checks and reports the compliance state of your device.

How often does the IME sync

The IME syncs per default ever 60 min but you can change the time if you create a registry value Interval in HKLM\SOFTWARE\Microsoft\IntuneManagementExtension\Settings. In this value you can specify the time in seconds.

Where can I find the logfiles

You can find the logfiles in the following folder C:\ProgramData\Microsoft\IntuneManagementExtension\Logs

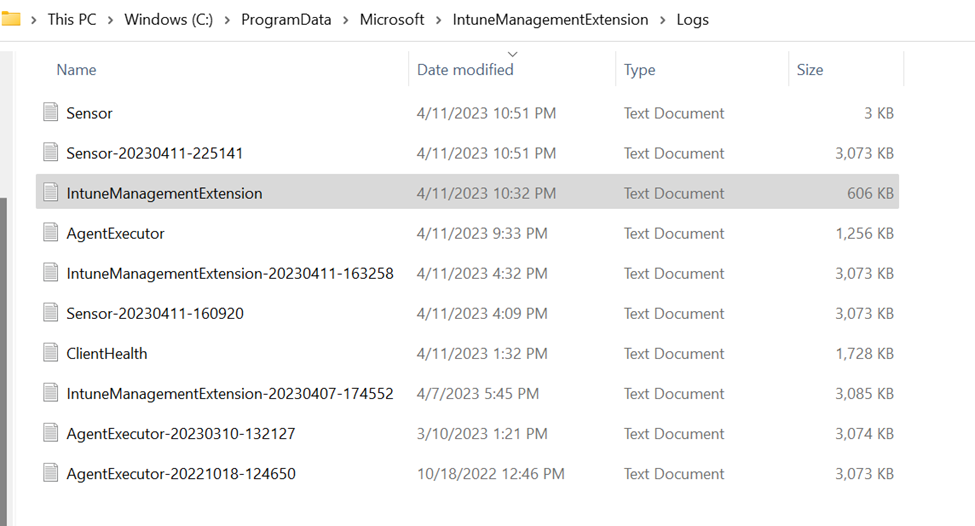
AgentExecution.log: Logfile for troubleshooting of PowerShell or Proactive Remediation scripts.

ClientHealth.log: Write health events related to the IME and remediation action

IntuneManagementExtension.log: Logfile for installations of Intune Win applications

Sensor.log: Logging of subscribed events
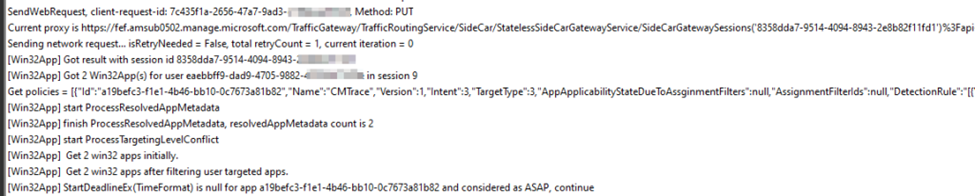
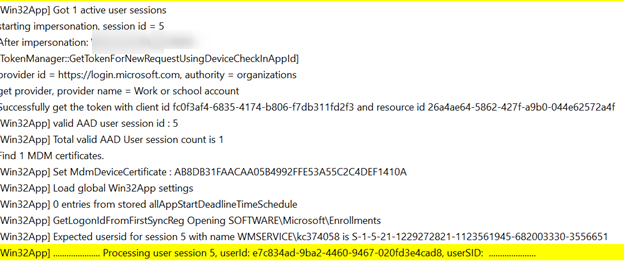
Processing App

Search for the line —->>[Win32App] … from here the actual processing of the app starts

Installation checks

Before the installation can start, two checks are made. The first is a detection if the app is already installed and the second is if the app is applicable for this system this means does the system full fill the requirements of the app.

App Detection check

The detection check is to check if the app is already installed on the system or not. This can be a registry key or the existence of a file or an MSI product code. Addition to that there are also the possibility to write a PowerShell script for the detection. This check is configured during the app creation in Intune.

App Applicability / Requirements check

The applicability check is used to check if the system meets the requirements of the app like min disk space, OS architecture, OS version or you can also create custom checks for a file, registry key or a custom script. Also, this is configured during the creation of the app in Intune.

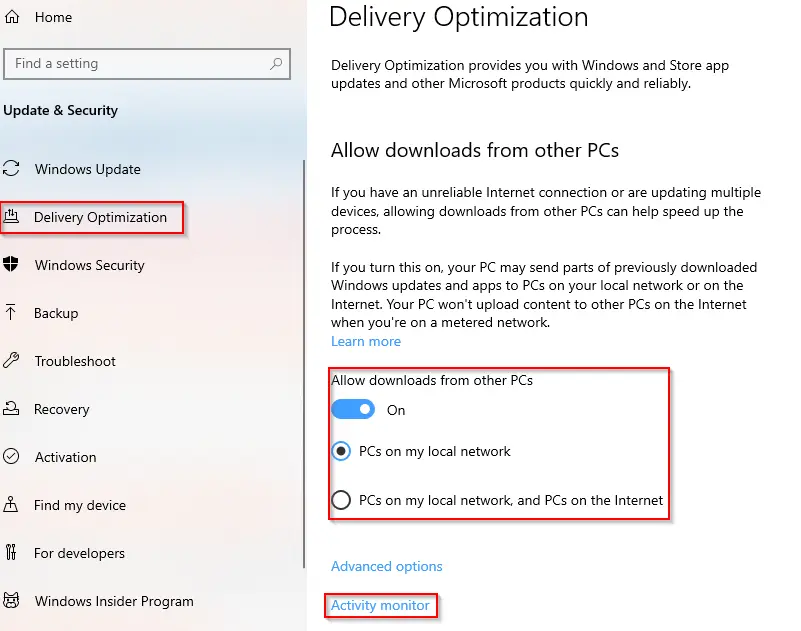
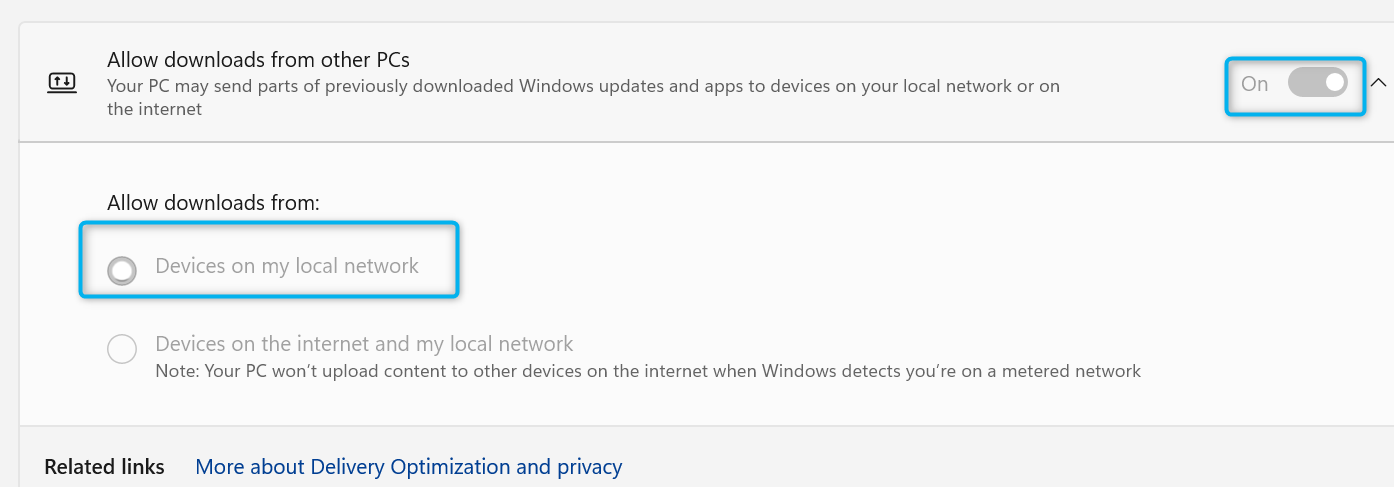
After that a new download job will be created. This is also where delivery optimization comes into play. The *.intune.bin file is now downloaded into the “C:\Program Files (x86) \Microsoft Intune Management Extension\Content\Incoming\” folder.

When the download is completed the Delivery Optimizations Service is notified that the download is done, and telemetry data is generated for the Deliver Optimization reporting. You can see how many bytes from which source (Internet/Lan/Group/MCC) are downloaded or how long the download took.

Finally, the file hash is checked and the intunewin.bin file is decrypted and unzipped. This *.intunewin file is now located in the “C:\Windows\IMECache\” folder.
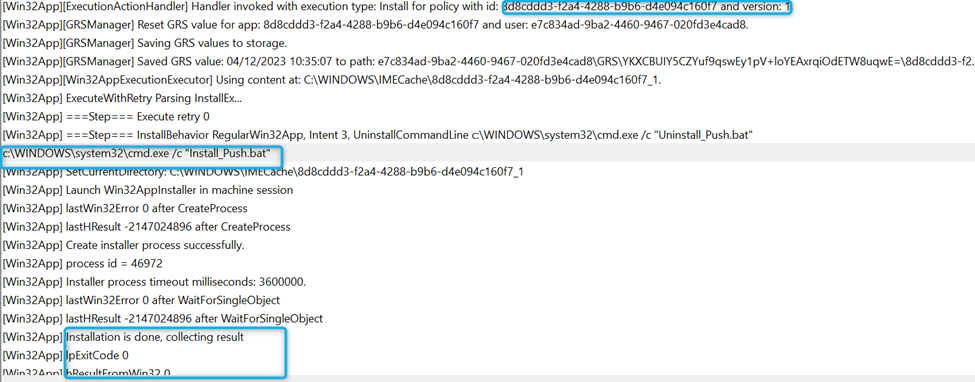
App Installation

The detection logic runs based on the app and then they are progressing

for this, the installation script is executed. In our case it is the install.bat script. For the installation an installer process is started as a user or machine session. After the installation is finished the process is evaluated if it ended with an error or if the installation was successful. The status of the installation can be found in the registry: “HKLM\SOFTWARE\Microsoft\IntuneManagementExtension\Win32Apps\user\appid “.

Completion of installation:

In the compliance phase, the compliance is checked based on the status of the installation and the app detection. This compliance status is written into the registry under: “HKLM\SOFTWARE\Microsoft\IntuneManagementExtension\Win32Apps\user\appid\ComplianceStateMessage”. When this is done, the content of “C:\Program Files (x86) \Microsoft Intune Management Extension\Content\Incoming\” is deleted.

In the very last phase, a report of the installation is saved locally and sent to Intune. Additionally, also the IME Cache in “C:\Windows\IME Cache\” is cleaned to finally complete the installation.

RemoveAppxPackage – Windows OS

<
<#
.SYNOPSIS
   This is AppxPackage removal script for the autopilot build devices

.DESCRIPTION
RemoveAppxPackage

.PARAMETER  
	Default Parametername

.EXAMPLE
	powershell -executionpolicy bypass -file RemoveAppxPackage.ps1

.NOTES
	NAME:		<RemoveAppxPackage>
	AUTHOR:		Kamalakannan
	KEYWORDS:	Keyword1


.CHANGE
	Author : Kamal 25/01/2023
	Version 1.0
	#>

Function main {

## Allows the use of -WhatIf
    [CmdletBinding(SupportsShouldProcess=$True)]

param(
    ## LogFile path for the transcript to be written to
        [Parameter(Mandatory=$false,ValueFromPipelineByPropertyName=$true,Position=0)]
        $LogFile = ("C:\xyz\LOGS\"+"RemoveAppxPackage"+'.log'),

    ## All verbose outputs will get logged in the transcript($logFile)
        [Parameter(Mandatory=$false,ValueFromPipelineByPropertyName=$true,Position=2)]
        $VerbosePreference = "Continue",

    ## All errors should be withheld from the console
        [Parameter(Mandatory=$false,ValueFromPipelineByPropertyName=$true,Position=3)]
        $ErrorActionPreference = "SilentlyContinue"
)

    ## Begin the timer
        $Starters = (Get-Date) 
	
	 ## Check $VerbosePreference variable, and turns -Verbose on
        Function global:Write-Verbose ( [string]$Message ) {
            if ( $VerbosePreference -ne 'SilentlyContinue' ) {
                Write-Host "$Message" -ForegroundColor 'Green'
            }
        }

        Start-Transcript -Path $LogFile
        Write-Verbose "Start time: $starters"
        
    ## Check $VerbosePreference variable, and turns -Verbose on
        Function global:Write-Verbose ( [string]$Message ) {
            if ( $VerbosePreference -ne 'SilentlyContinue' ) {
                Write-Host "$Message" -ForegroundColor 'Green'
            }
        }
  Function Removeappx 
{ 
$applist = @("*communications*"
"*camera*"
"*dolbyaccess*"
"*fitbitcoach*"
"*officehub*"
"*solitairecollection*"
"*Teams*"
"*bingfinance*"
"*zunevideo*"
"*bingnews*"
"*people*"
"*windowsphone*"
"*phototastic*"
"*picsart*"
"*plex*"
"*skypeapp*"
"*SpotifyMusic*"
"*bingsports*"
"*bingweather*"
"*xbox*")
foreach ($app in $applist)
{
	Write-Host "Searching for Appx Provisioned Package: $app"
	Get-AppxPackage $app | Remove-AppxPackage
	$pkglist = Get-AppxProvisionedPackage -online | Where-Object DisplayName -Like $app
	if ($pkglist -ne $null)
	{
		foreach ($pkg in $pkglist)
		{
			Write-Host "Removing Appx Provisioned Package: $app"
			Remove-AppxProvisionedPackage -online -packagename $pkg.PackageName
		}
	}
	else
	{
		Write-Host "Unable to find package $app"
	}	
}
}

 Removeappx
	
    ## Completed Successfully!
        Write-Host (Stop-Transcript) -ForegroundColor Green
}

main


How to uninstall Windows Default apps with PowerShell

By using PowerShell, we can uninstall Windows apps independently, one by one, but it is also possible to uninstall all the Windows apps at once with a single command. Moreover, we are also able to choose whether to remove Windows apps only from our user account or from all the user accounts on a computer if we want. Let’s see how to uninstall a single Windows app from PowerShell first, as promised.

List of Default apps and its package removal commandlet:

  • 3D Builder Get-AppxPackage 3dbuilder | Remove-AppxPackage
  • ACG Player Get-AppxPackage acg | Remove-AppxPackage
  • Alarms and Clock Get-AppxPackage alarms | Remove-AppxPackage
  • AV1 Codec Get-AppxPackage AV1VideoExtension | Remove-AppxPackage
  • Calculator Get-AppxPackage calculator | Remove-AppxPackage
  • Calendar and Mail Get-AppxPackage communications | Remove-AppxPackage
  • Cortana Get-AppxPackage Microsoft.549981C3F5F10 | Remove-AppxPackage
  • Camera Get-AppxPackage camera | Remove-AppxPackage
  • Disney+ Get-AppxPackage disney | Remove-AppxPackage
  • Dolby Access Get-AppxPackage dolbyaccess | Remove-AppxPackage
  • Feedback Hub Get-AppxPackage WindowsFeedbackHub | Remove-AppxPackage
  • Fitbit Coach Get-AppxPackage fitbitcoach | Remove-AppxPackage
  • Office Get-AppxPackage officehub | Remove-AppxPackage
  • Get Started Get-AppxPackage getstarted | Remove-AppxPackage
  • Music Get-AppxPackage zunemusic | Remove-AppxPackage
  • HEIF image support Get-AppxPackage HEIFImageExtension | Remove-AppxPackage
  • Get Help Get-AppxPackage GetHelp | Remove-AppxPackage
  • Maps Get-AppxPackage maps | Remove-AppxPackage
  • Microsoft Edge Get-AppxPackage MicrosoftEdge | Remove-AppxPackage
  • Microsoft Solitaire Collection Get-AppxPackage solitairecollection | Remove-AppxPackage
  • Microsoft To-Do Get-AppxPackage Todos | Remove-AppxPackage
  • Microsoft Teams Get-AppxPackage Teams | Remove-AppxPackage
  • Money Get-AppxPackage bingfinance | Remove-AppxPackage
  • Movies & TV Get-AppxPackage zunevideo | Remove-AppxPackage
  • News Get-AppxPackage bingnews | Remove-AppxPackage
  • Notepad Get-AppxPackage WindowsNotepad | Remove-AppxPackage
  • OneNote Get-AppxPackage onenote | Remove-AppxPackage
  • OneDrive Get-AppxPackage OneDriveSync | Remove-AppxPackage
  • Paint Get-AppxPackage Paint | Remove-AppxPackage
  • People Get-AppxPackage people | Remove-AppxPackage
  • Phone Companion Get-AppxPackage windowsphone | Remove-AppxPackage
  • Phototastic Collage Get-AppxPackage phototastic | Remove-AppxPackage
  • Photos Get-AppxPackage photos | Remove-AppxPackage
  • PicsArt Get-AppxPackage picsart | Remove-AppxPackage
  • Plex Get-AppxPackage plex | Remove-AppxPackage
  • PowerAutomate Get-AppxPackage PowerAutomateDesktop | Remove-AppxPackage
  • Screen and Sketch/Snipping Tool Get-AppxPackage ScreenSketch | Remove-AppxPackage
  • Skype Get-AppxPackage skypeapp | Remove-AppxPackage
  • Store Get-AppxPackage windowsstore | Remove-AppxPackage
  • Sticky Notes Get-AppxPackage MicrosoftStickyNotes | Remove-AppxPackage
  • Spotify Get-AppxPackage SpotifyMusic | Remove-AppxPackage
  • Sports Get-AppxPackage bingsports | Remove-AppxPackage
  • Voice Recorder Get-AppxPackage soundrecorder | Remove-AppxPackage
  • Weather Get-AppxPackage bingweather | Remove-AppxPackage
  • WebP image support Get-AppxPackage WebpImageExtension | Remove-AppxPackage
  • Windows Terminal Get-AppxPackage WindowsTerminal | Remove-AppxPackage
  • Xbox Get-AppxPackage xbox | Remove-AppxPackage
  • Your Phone Get-AppxPackage YourPhone | Remove-AppxPackage

Delivery Optimization – Autopilot Build devices

Why?

The current on-prem solution like the Configuration manager peer caching which is using the client settings, to save the bandwidth during the Autopilot build Pre-provisioning (Whit glove) process in corporate network, the content wont be downloaded multiple times over the same leased line from the CDN , isn’t it amazing you only download the content per subnet once then the binaries being shared- locally ?, how cost effective it would be for the organization , see below for further info.

How to configure ?

We do have the Intune Configuration profile to setup the same settings catalog for the Delivery optimization.

https://learn.microsoft.com/en-us/mem/intune/configuration/delivery-optimization-settings – refer this for more info.

In group ID you want to choose your Prod – AD group ID, so that devices in that group only gets this policy default.

Delivery Optimization is a technology that’s shipped with Windows 10 and is active by default. It enables your computer to search the local network, LAN or WLAN, and download updates from neighbors, and only use the central site when needed.

By doing this, you will save both time and bandwidth while keeping your devices up to date.

How to check its working on your windows devices.

  1. Open the Start Menu, Click SettingsUpdate & Security.
  2. Click the Delivery Optimization button on your left to find the settings we are looking for.

When its managed by your organization , if its only local network the devices would have the above settings applied on it, you are free to configure and allow it download even from the Internet but it depends on one organization security policy.

The introduction of Delivery Optimization by Microsoft enabled us to streamline our update deployments. We are able to achieve high update compliance in remote offices, which has always been a challenge.

Also we have now b/w savings over the leased line by 38% when a device is connect to the office network!! and overall 23% in this Remote working scenario, isn’t it amazing what are you waiting for go-ahead and implement it today.

Disable the Consumer teams on the windows11

<#
.SYNOPSIS
   This is for the Windows 11 build devices which gets the consumer version and work version of teams installed.

.DESCRIPTION
 Disablewindows11teamsconsumer

.PARAMETER  
	Default Parametername

.EXAMPLE
	powershell -executionpolicy bypass -file DisableTeamsforWindows11.ps1

.NOTES
	NAME:		<SystemTagging>
	AUTHOR:		Engineering
	KEYWORDS:	Keyword1


.CHANGE
	Author : Kamal  14/09/2022
  	Version 1.0

#>

Function main {

## Allows the use of -WhatIf
    [CmdletBinding(SupportsShouldProcess=$True)]

param(
    ## LogFile path for the transcript to be written to
        [Parameter(Mandatory=$false,ValueFromPipelineByPropertyName=$true,Position=0)]
        $LogFile = ("C:\xyz\LOGS\"+"DisableTeamsconsumerInstallwforwindows11"+'.log'),

    ## All verbose outputs will get logged in the transcript($logFile)
        [Parameter(Mandatory=$false,ValueFromPipelineByPropertyName=$true,Position=2)]
        $VerbosePreference = "Continue",

    ## All errors should be withheld from the console
        [Parameter(Mandatory=$false,ValueFromPipelineByPropertyName=$true,Position=3)]
        $ErrorActionPreference = "SilentlyContinue"
)

    ## Begin the timer
        $Starters = (Get-Date) 
	
	 ## Check $VerbosePreference variable, and turns -Verbose on
        Function global:Write-Verbose ( [string]$Message ) {
            if ( $VerbosePreference -ne 'SilentlyContinue' ) {
                Write-Host "$Message" -ForegroundColor 'Green'
            }
        }

        Start-Transcript -Path $LogFile
        Write-Verbose "Start time: $starters"
        
    ## Check $VerbosePreference variable, and turns -Verbose on
        Function global:Write-Verbose ( [string]$Message ) {
            if ( $VerbosePreference -ne 'SilentlyContinue' ) {
                Write-Host "$Message" -ForegroundColor 'Green'
            }
        }
	
Function WriteToTeams	{
    $regRoot = "HKLM:\Software\Microsoft\Windows\CurrentVersion\Communications"   
    $installDate = (Get-Date -Format "yyyy-MM-dd HH:mm:ss") 
    $objScriptTime = New-Object -ComObject WbemScripting.SWbemDateTime
    $objScriptTime.SetVarDate($installDate)
    $installDateDMTF = $objScriptTime.Value 
	
	md $regRoot -force
	New-ItemProperty $regRoot -Name "ConfigureChatAutoInstall"     -Value "0"     -PropertyType "String" -Force
          }
		
	WriteToTeams
	
    ## Completed Successfully!
        Write-Host (Stop-Transcript) -ForegroundColor Green
}

main
SettingValue
NameRemove Chat
DescriptionRemoves Windows 11 Teams Chat
OMA-URI./Device/Vendor/MSFT/Policy/Config/Experience/ConfigureChatIcon
Data typeInteger
Value3

Managing the Teams Chat icon on Windows 11 – Windows Client | Microsoft Docs – refer this link for the settings.

Getting rid of Teams (consumer), revisited – Out of Office Hours (oofhours.com) – we did this work based on the Mike blog.

High CPU Utilization during Dual scan – Intune/Configmgr

We have an issue where the client has workload enabled in Intune for WufB and Office click to run apps but the client scan from both Intune and Configmgr reported the memory leak 100% and Froze the PC from workability.

we have it back on normal or decent level 40~50 % when the MECM and or Intune agent has the assigned workload only.

For some reason the workload is not assigned properly, when there is a clash b/w on prem vs cloud within the agent then this is happening.

What to check ?

  1. Check for the windows update agent log.
  2. Check for the applied policy both from on-Prem and Intune (device configuration status if any)

What action to be done for the remediation?

  1. Uninstall and reinstall the agent.
  2. C:/windows/system32/grouppolicy/machine/registry.pol ( recreation)
  3. Cross test.
  4. check the status and create MDMdiagnostics report.

Also , the Clickshare app auto update has contributed considerably once the above is resolved, removal of the app brought the memory utilization from high 50~ 60% to lower 20~,so which may also played its part., as per the Windows OS support

Posted in Uncategorized. Tags: , , . Leave a Comment »

Autopilot system tagging

   This is tagging for the autopilot build devices

You may come across system tagging for the autopilot build may be for CMDB or Service now purpose if you have both Traditional build and autopilot. which may help an organization to manage the devices well by categories.


<#
.SYNOPSIS
   This is tagging for the autopilot build devices

.DESCRIPTION
 AutopilotSystemTagging

.PARAMETER  
	Default Parametername

.EXAMPLE
	powershell -executionpolicy bypass -file Autopilot_Tagging.ps1

.NOTES
	NAME:		<SystemTagging>
	AUTHOR:		kamal
	KEYWORDS:	Keyword1


.CHANGE
	Author : Kamal 12/07/2022
	Version 1.0

#>

Function main {

## Allows the use of -WhatIf
    [CmdletBinding(SupportsShouldProcess=$True)]

param(
    ## LogFile path for the transcript to be written to
        [Parameter(Mandatory=$false,ValueFromPipelineByPropertyName=$true,Position=0)]
        $LogFile = ("C:\blabla\LOGS\"+"AutopilotSystemTagging"+'.log'),

    ## All verbose outputs will get logged in the transcript($logFile)
        [Parameter(Mandatory=$false,ValueFromPipelineByPropertyName=$true,Position=2)]
        $VerbosePreference = "Continue",

    ## All errors should be withheld from the console
        [Parameter(Mandatory=$false,ValueFromPipelineByPropertyName=$true,Position=3)]
        $ErrorActionPreference = "SilentlyContinue"
)

    ## Begin the timer
        $Starters = (Get-Date) 
	
	 ## Check $VerbosePreference variable, and turns -Verbose on
        Function global:Write-Verbose ( [string]$Message ) {
            if ( $VerbosePreference -ne 'SilentlyContinue' ) {
                Write-Host "$Message" -ForegroundColor 'Green'
            }
        }

        Start-Transcript -Path $LogFile
        Write-Verbose "Start time: $starters"
        
    ## Check $VerbosePreference variable, and turns -Verbose on
        Function global:Write-Verbose ( [string]$Message ) {
            if ( $VerbosePreference -ne 'SilentlyContinue' ) {
                Write-Host "$Message" -ForegroundColor 'Green'
            }
        }
   
Function WriteToCPH {

    $regRoot = "HKLM:\SOFTWARE\CMD\BuildParameters"   
    $installDate = (Get-Date -Format "yyyy-MM-dd HH:mm:ss") 
    $objScriptTime = New-Object -ComObject WbemScripting.SWbemDateTime
    $objScriptTime.SetVarDate($installDate)
    $installDateDMTF = $objScriptTime.Value 

    md $regRoot -Force
  
    New-ItemProperty $regRoot -Name "blabla"     -Value "Autopilot"     -PropertyType "String" -Force

            }

    WriteToCPH
	
Function WriteToOrg	{
    $regRoot = "HKLM:\SOFTWARE\Microsoft\Windows NT\CurrentVersion"   
    $installDate = (Get-Date -Format "yyyy-MM-dd HH:mm:ss") 
    $objScriptTime = New-Object -ComObject WbemScripting.SWbemDateTime
    $objScriptTime.SetVarDate($installDate)
    $installDateDMTF = $objScriptTime.Value 
	
	md $regRoot -Force
	New-ItemProperty $regRoot -Name "RegisteredOrganization"     -Value "blabla.org"     -PropertyType "String" -Force
    New-ItemProperty $regRoot -Name "RegisteredOwner" -Value "blabla.org" -PropertyType "String" -Force
        }
		
	WriteToOrg
	
    ## Completed Successfully!
        Write-Host (Stop-Transcript) -ForegroundColor Green
}

main


}

main

Note: you might change the below as per your requirement.

$regRoot = “HKLM:\SOFTWARE\xyz\BuildParameters”

$LogFile = (“C:\blabla\LOGS\”+”AutopilotSystemTagging”+’.log’),